

Understanding the Basics of Grain Dryer Assembly
If you’re planning to install a grain dryer on your farm or facility, one of the first things you’ll come across is the grain dryer assembly process. For many farmers and agricultural operators, this can feel overwhelming at first. After all, grain dryers are large, technical pieces of equipment involving structural, mechanical, and electrical components.
But here’s the good news: understanding how grain dryers are assembled – and what it takes to do it right – will not only save you money but also extend the life of your equipment and help avoid downtime during the critical harvest season.
Whether you’re installing a circulating grain dryer, a batch dryer, or a tower grain dryer, the process has similar foundations. In this article, we’ll walk through the practical details of grain dryer assembly in a way that’s easy to follow, no matter your experience level.
Why Proper Assembly Matters: Avoiding Costly Mistakes
Assembly isn’t just about putting metal parts together. Done wrong, a misaligned or unbalanced grain dryer can cause serious issues:
- Uneven drying due to airflow problems
- Increased energy consumption
- Shortened equipment lifespan
- Safety hazards, including fire risk or system failure
Most importantly, poor assembly can delay your harvest operations. That’s why many farmers who’ve been through the process say that taking time during the grain dryer assembly stage saves time and money later.
Step-by-Step Guide to Assembling a Grain Dryer
Every model is different, and always follow the manufacturer’s manual. That said, here’s a general overview based on industry-standard assembly procedures:
1. Site Preparation and Foundation
Before the grain dryer even arrives, site work should be completed.
- Level the ground properly – this isn’t just cosmetic. An unlevel base will affect stability and airflow.
- Pour a reinforced concrete pad based on the dimensions and load requirements of the dryer.
- Make sure the site is close to power supply, fuel source (gas, diesel, or biomass), and grain storage facilities.
Long-tail keyword: grain dryer foundation installation
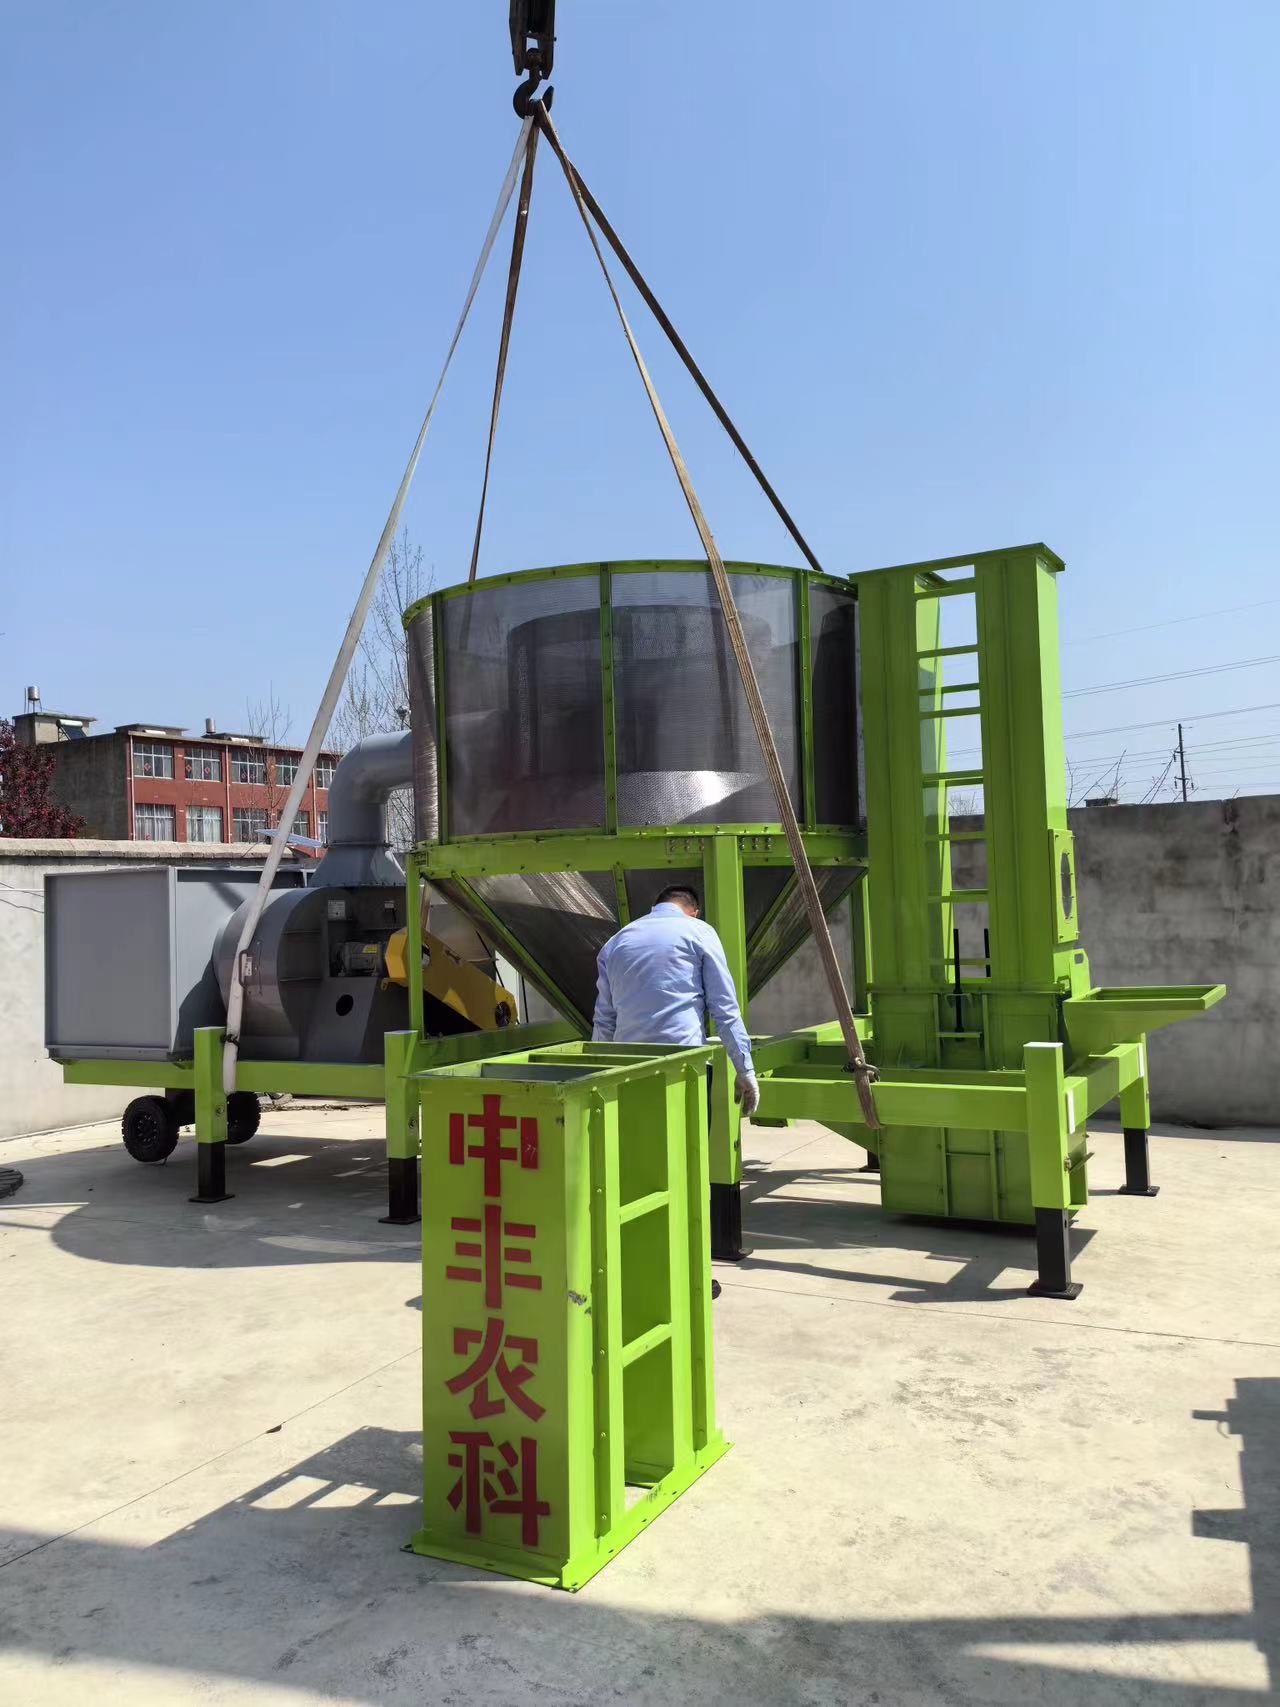
2. Main Frame and Component Setup
Once the frame arrives in sections, you’ll begin building it upward.
- Assemble the base frame, then install columns, horizontal beams, and platform ladders.
- Use lifting equipment like cranes or forklifts, especially for tower dryers that can be over 40 feet tall.
- Next, install the grain inlets, exhaust ducts, fans, and heat source systems.
Long-tail keyword: grain dryer component installation guide
3. Electrical and Fuel Connections
You’ll now move into the more technical phase.
- Connect all control panels, safety switches, sensors, and alarms.
- If it’s an automatic grain dryer, configure timers and moisture sensors for precision drying.
- Hook up fuel lines safely and ensure compliance with local fire codes.
Always have a certified electrician and fuel technician involved.
4. Testing and Calibration
Before full operation, run the dryer without grain to test:
- Fan rotation and airflow
- Burner ignition and heat output
- Thermostats and moisture detectors
- Safety shut-off systems
Adjust airflow dampers and burners as needed for efficiency.
Long-tail keyword: how to test a grain dryer after assembly
Real-World Experience: What Farmers Say About DIY Assembly
John, a farmer from Iowa, shared his experience:
“We decided to assemble a 30-ton grain dryer ourselves. Took about 4 full days with a crew of five, and we rented a small crane. Saved over $6,000 in contractor fees, but we had to be really precise. The key was doing a full mock run before loading grain.”
Another user in Kansas noted:
“I wouldn’t recommend DIY assembly unless you’ve got some experience. We partnered with a local technician to handle the electrical part, and that gave us peace of mind.”
Common Challenges and How to Overcome Them
- Missing Parts or Incorrect Fit
Always cross-check shipment against the parts list before beginning. Don’t assume everything is there. - Poor Weather Conditions
Assembly outdoors? Schedule in clear weather and cover electrical components immediately after installation. - Unfamiliar Instructions
Grain dryers often come with generic manuals. Call the manufacturer’s support line or ask for a video walkthrough if something’s unclear. - Lifting Equipment Access
Don’t attempt large-frame assembly without forklifts or cranes. Injuries during assembly can be costly.
Long-tail keyword: common grain dryer installation problems
Final Thoughts: Is DIY Grain Dryer Assembly Right for You?
If you’re mechanically inclined, have a reliable crew, and are comfortable with basic electrical and fuel systems, doing your own grain dryer assembly could save you thousands. But if this is your first time or you’re under tight deadlines, hiring professionals or doing a partial assembly with expert assistance may be the smarter choice.
The most important thing? Don’t rush. The performance of your grain dryer heavily depends on the quality of the assembly. A few extra hours spent double-checking levels, alignments, and connections will pay off when your grain dries evenly and efficiently for years to come.
Zhongfeng Agricultural Science recommends that you use our company’s grain dryers, mobile grain dryers, and grain drying towers

 WeChat QR code